Blood Throne: Shaman in Depth

Hey everyone, Reece here with another in our in-depth series of articles—this time: the Shaman!
I have family in town so was not able to record the podcast but will do so once I am able!
Enter the Pledge Manager Here!
We have previously covered the following classes:
Martial Characters:
To read the Fighter in depth article, click here.
To read the Barbarian in depth article, click here.
To read the Ranger in depth article, click here.
To read the Rogue in depth article, click here.
Skill Classes:
To Read the Warlord in depth article, click here.
To Read the Bard in depth article, click here.
Arcane Classes:
To read the Dread Mage in depth article, click here.
So, we previously covered the Dread Mage in the Arcane archetype classes. The Dread Mage is a crowd control, DPS, and secondary healing class that likes to operate at longer range. They’re tricky to learn but awesome once you get the hang of them. The Shaman, in contrast, is quite straightforward. Summon a mighty War Bear, toss some awesome buffs on allies, debuff enemies, then get stuck in and shred things with your claws!

Conceptually, I’ve always loved the idea of a Shaman—ever since (dating myself here, haha) I played EverQuest back in the day. My high school group had an awesome Shaman in it, and I loved the idea of animal-based magic on a caster who wasn’t afraid to wade into melee. In Blood Throne, it fits well, as many of the factions in the game are more pastoral—leaning into the natural world and magic rather than relying on technology.
One of the overall class archetypes I built into the game was a mage that specialized in buffing and debuffing magic. As a refresher, in Blood Throne there are two broad types of status effects: those that last one turn and those that last the whole game. Blessings are positive effects that last the entire game, and Curses are the inverse. These can only be removed by a Negation ability—like the Inquisitor’s Strip Blessing or Strip Curse—or by using an item such as a Dispel Scroll, etc. The Priest, for example, has very powerful Blessing buffs, and the Druid has strong Curses, but the Shaman has both! A key Blessing on an ally—or Curse on an enemy—can really change the course of a game.
Summoning is also just a cool ability in any game, and the Shaman was a perfect fit for a class that could summon animals. The Druid, by contrast, is the other summoner in the Core Box, but we leaned into the Druid being more connected to the mystical side of nature and so they summon magical beasts. The Shaman, however, is directly tied to the physical aspect of nature. All of their spells are animal-themed—granting the aspect of a specific animal to bolster an ally or hinder an opponent.
A custom Shaman can be built to be a melee powerhouse—like Kar Bjornson, the pre-made hero in the Core Box—or built purely as a support hero, handing out powerful buffs to allies and their summon while hanging back and focusing on debuffs. It’s totally up to you how you want to spec them out. The upside to going pure support is that you can dump all your stat points into spell accuracy and defense, whereas if you want a Shaman that also dishes out pain in combat, you’ll need to spread your points around more.
This idea of a “melee mage” is one I really liked and tried to build into every faction. The Priest, for example, can be built to kick butt in melee—like a D&D-style Cleric—or can be specced for pure buffs and heals. I wanted each class to have flexibility and room for customization.

Equipment Restrictions
Shamans have the normal Arcane Archetype equipment restrictions—light weapons, light armor, and Arcane-specific gear—with one major exception: they can equip weapons with the Natural Weapon keyword. These weapons function similarly to using your own body, so Kar’s giant bone claws, for example, are mechanically treated like punching something with your fists.
Here’s the cool part: if you have two of the same Natural Weapon, you get to Dual Wield them for free. Normally, you’d need to take the Dual Wield Feat to do that, but these weapons bypass that requirement. Obviously, this is very strong, so to balance it out, models using Natural Weapons cannot Parry—essentially, trying to block a sword with your hands. Yeah… not great.

Parrying is a very common defensive action used to reduce incoming damage, and not having access to it is a pretty serious drawback. What it means in practice is that models built this way are all gas, no brakes. Offensively powerful, but with basically no way to reduce incoming damage—you’ll have to plan for that when building your hero.
Outside of that exception, you can opt for a more traditional Shaman build using an Arcane Staff and Class Garb. While Class Garb doesn’t provide any protection, it gives you an extra Class Skill, which is a popular choice for casters that rely heavily on their abilities.

Class Ability: Spirit Claws
The Shaman’s Class Ability, Spirit Claws, is very strong. It’s a Blessing that grants the target model +1 RD per successful Natural Weapon hit in melee. So, if the Shaman casts it on themself and lands both claw hits, they add 2 RD to the Damage Dice pool. That’s a lot.
Claws deal 4 DD per hit, and combined with a solid Power stat, you’ll be throwing a handful of dice at your target—often enough to kill low-tier monsters in a single hit. You can also cast this on another Hero, or your summon, if they’re using Natural Weapons. If you built a more support-style Shaman, putting this on your War Bear makes it even nastier in melee while you sit back and watch the carnage.
As if that weren’t good enough, there are several Feats that further boost Spirit Claws. Hungry Spirit Claws lets the model heal 1 RD every time they hit with Spirit Claws—a great way to mitigate the fact that you can’t Parry. Just keep swinging and heal through it! Shared Spirit Claws, available at level 8, lets you apply the Blessing to both the Shaman and their Summon. Why choose when you can have both?

Arcane Overload
Quick sidenote: all Arcane classes have access to a general action called Arcane Overload. It’s a full-round action that lets you cast 3 spells in one turn (but takes all your Actions), and then you can’t cast spells on your next Activation. We specifically added this to the game for classes like the Shaman that want to get a lot of buffs up quickly before the Heroes scatter across the board and out of range or LoS.
At early levels it doesn’t come up as often, but later in the game when your Shaman is packing a bunch of buffs, you’ll absolutely want to use this. It also comes in clutch for DPS-style casters who find themselves in a situation where they need to blow up a group of monsters or get knocked out trying. It’s a fun and powerful tool for casters to keep in mind.
Primary Skill Tree: Blessings
As stated earlier, the Shaman’s bread and butter is buffing. These game-long buffs can really change how a Hero performs, giving them the extra edge to overcome a weakness or double down on a strength.

Beast’s Hide
At level 1, the Shaman gets access to Beast’s Hide, which grants the target the Barrier status—easily one of the best all-around defensive Blessings in the game. Barrier is unique in that while it lasts the whole game, it breaks the moment the target takes damage, reducing that damage to 0 and then being removed. What it does is give you a “free hit,” so to speak.
While it might not sound flashy on paper, once you get the hang of using it, you’ll realize just how impactful it is. First, and most obviously, it allows you to ignore one instance of damage, which can be huge. If you’re facing a heavy melee hitter like the Berserker or a boss monster like Ghorgantus, Barrier can literally be the difference between life and death. Slap it on a tanky Hero like Ajax and it makes him way harder to bring down—especially if you reapply it every turn, effectively halving the damage he takes over time.
But there are trickier plays, too. For instance, cast it on a squishy ally stuck in melee combat and they can walk away safely, ignoring the Attack of Opportunity. Same trick works if you need to grab an objective near an enemy—let them take their free swing, eat 0 damage, and complete your mission.
It’s not perfect, though. While it negates the damage, it doesn’t prevent secondary effects like Stun, Knockdown, or anything else the attack might apply. And in PvP, a smart opponent will throw out a weak attack first just to break the Barrier before following up with something heavy. Still, as stated, it’s an awesome tool to have in your arsenal.

Bull’s Strength
At level 2, the Shaman gets Bull’s Strength. This is another fantastic buff, increasing the target’s Power stat by +1 for the rest of the game. That’s useful on any Hero that deals damage, as Power is typically added to the Damage Dice Pool for an attack.
Heroes that already throw out big damage—like Kijo, Grey Wolf, or the Druid Moss Beard—get a lot of value here as it pushes their output even higher. Power also often boosts healing amounts, so it’s surprisingly great on Brother Boldstand, the Priest, who excels at both melee and healing.
You can further enhance this with the Animal Might Feat, which adds an additional +1 Power, for a total of +2. Stick that on a model like Kijo, who already throws a bucket of damage dice, and things start to get hilarious. Kijo, being a Barbarian class, also gets access to Barbaric Blow, which adds +2 Power to the Damage Dice Pool. Stack it all together, and you’re tossing +4 Power dice—enough to obliterate most things in a single swing of her mighty Tetsubo. It’s a lot of fun to need two hands just to hold all your dice.

Gazelle’s Stride
At level 4, the Shaman gains Gazelle’s Stride, a Blessing that gives the target +1 Movement Point for the rest of the game. Movement is incredibly valuable in any miniatures game, and this is no exception.
You’ll usually use this to make a slower Hero—like Kar himself, who has a base Move of 4—a bit more mobile. Or, you can make an already fast Hero really fast. Dalnon is a great example. With his natural Elf speed of 6, bumping him to 7 makes him absolutely zip around the board.

Falcon’s Wings
At level 8, the Shaman unlocks Falcon’s Wings. This is a powerful Blessing that grants the Fly keyword. Fly allows the target to move over intervening terrain and models as if they weren’t there, making your movement much more efficient.
It’s worth noting, however, that Fly doesn’t let you ignore Attacks of Opportunity. So if you’re engaged before you start moving—even if you’re flying—the monster still gets a free swing. That aside, though, Fly is huge. Blood Throne uses a lot of 3D terrain features, and not having to climb up or down walls saves you tons of movement and opens up all kinds of tactical options.

Jaws of the Beast
At level 10, the Shaman gains their Ultimate ability: Jaws of the Beast. Like all Ultimates, this is a Once Per Game skill—and it’s a nasty one.
For the rest of the game, the target model gets to make a Free Attack Action during each Activation. This attack deals 3 DD + Power damage and, if it hits, the Hero also heals 2 RD. So not only are you increasing your damage output significantly, but you’re also healing as you do it.
It’s a savage buff that turns a melee Hero into a straight-up blender.
Secondary Skill Tree: Curses
The Shaman’s Secondary Skill Tree is focused on Curses—the dark mirror of Blessings. These are long-lasting debuffs that target key monsters or opposing Heroes, crippling their strengths in a way that often forces your opponent to totally rethink their strategy. And since these effects last for the entire game (unless removed), they can really change how a scenario unfolds.

Elephant’s Agility
At level 1, the Shaman gets Elephant’s Agility, which applies the Dazzled status to the target. Dazzled halves the target’s Evasion stat, which is massive. Some monsters and Heroes rely almost entirely on being hard to hit to survive—this strips that defense away.
For example, Song of the Phoenix, the Bard we covered in a previous article, has a whopping Evasion of 8. Hit him with Dazzled, and that drops to a much more manageable 4. That means he’s suddenly taking way more hits than usual, which can be a death sentence for fragile Heroes like him.
It also helps that this spell targets Fortitude—a defensive stat that many high-Evasion models tend to neglect. Cast this on any rogue-style monster that’s dancing around your front line and watch them get flattened.

Sloth’s Speed
At level 6, the Shaman unlocks Sloth’s Speed, one of the nastiest debuffs in the game. It applies the Hobbled status to the target, which halves their Movement stat for the rest of the game.
This can be crippling. You can turn a fast monster into a slow one, or slow an already slow tank down to the point that they’re basically a statue. In PvP, players hate this, especially if you hit a tanky Hero like Ajax and drop their Movement to 2. They’re effectively out of position for the next round or two and may never catch up again. It’s brutal—but fair.
Tertiary Skill Tree: Summoning
Summoning is the Shaman’s third area of expertise, and it’s a fun one. They can bring the mighty War Bear into play to fight at their side. Summoning in Blood Throne is fairly straightforward—it’s always a Once Per Game ability, requires a Ritual Action (meaning it takes your whole turn), and you can only have one summon in play at a time.
Once summoned, the creature acts just like one of your Heroes—with a few exceptions. Summons don’t get to use Simple Actions so they can’t focus, and they can’t interact with Objectives (like opening chests or disarming traps). That means your Bear isn’t going to be picking up treasure for you, haha. But they’re still incredibly useful—they’re essentially disposable Heroes.
You can use them to rip through low-tier monsters, hold a flank, block a choke point, soak hits, defend an objective in PvP, or just cause general chaos. They’re versatile tools, and the models themselves are just plain awesome.

The War Bear
The War Bear, specifically, is a powerhouse. While he’s not blazing fast (Move 4), he hits hard. Animal-category summons or monsters almost always use Natural Weapons, so with two claw attacks, the Bear gets to Dual Wield by default—no Feat required.

His claws hit for 4 DD each, and with a Power of 2, if both attacks land, you’re looking at a 10-dice Damage Pool. That’s big. That said, the War Bear’s Accuracy is only 1, so he can miss. It’s definitely worth trying to boost his odds to land hits when you can.
He’s also no pushover defensively, with a solid 18 HP. He will be taking hits, though—his Evasion is only 1, so anything swinging at him is likely to connect. That’s the trade-off: high damage and health, but easy to hit.

Like all summons, the War Bear has a Special Ability: War Bear Hug. This deals 2 RD, Pins the target, and importantly—it targets Fortitude instead of Evasion. If the Bear is engaged with a slippery, high-Evasion model that it can’t reliably hit with normal attacks, you can throw out Bear Hug instead for better odds of connecting.
Pinned also prevents the target from moving at all, which is incredibly useful for locking down high-threat enemies or interrupting an opponent’s plan.

Enhancing Summons
The Shaman has two Feats that can enhance their summoning power:
At level 4, they can take Prepared Summon, which changes summoning from a Ritual Action to a Standard Action. This is a huge quality-of-life upgrade. Not only does it free you up to cast something else that turn, but it means you can now summon as a Move-Cast Action (with a risk of spell failure), or as part of an Arcane Overload combo—summon and toss out two buffs in one go!
At level 6, they can choose Summon Greater War Bear, which boosts their pet’s stats significantly. Accuracy goes up to 3, Power gets +1, HP increases by 7, and so on. This helps the Bear scale into the late game and stay relevant as enemies get stronger. You don’t have to take this feat—the base Bear is still solid—but if you want your fuzzy buddy to keep wrecking face in the late game, this is the way.

Feats
The Shaman’s Feat Tree focuses on enhancing their spellcasting abilities and, to a lesser extent, their melee prowess. Just as a refresher: all classes get access to General Feats at odd-numbered levels, which any class can take, and Class-Specific Feats at even levels, which are unique to that class.
Here’s a breakdown of the Shaman’s core Feats:
Level 2 – Choose between Reaching Spells and Hungry Spirit Claws.
We’ve already talked about Hungry Spirit Claws—it lets you heal 1 RD every time you hit with Spirit Claws. It’s great for a melee Shaman who’s trading hits every turn.
Reaching Spells, on the other hand, increases your spell range by +1 square. That might not sound like much, but since offensive spells are generally Medium range and defensive ones are Short, that extra square can be clutch—especially when you want to cast from just outside of an enemy Inquisitor’s Denial range.
Level 4 – Choose between Animal Might and Prepared Summon.
This one’s tough. As we discussed, Animal Might lets your Bull’s Strength Blessing give +2 Power instead of +1, which is bonkers on the right Hero. But Prepared Summon gives you so much flexibility. It really depends on your build—are you leaning more into buffing others or getting your Bear onto the board as efficiently as possible?
Level 6 – Choose between Summon Greater War Bear and Powerful Blessings.
Summon Greater War Bear gives your Bear a big stat bump, while Powerful Blessings makes it harder for opponents to remove your buffs. Any time a Monster or Hero tries to remove one of your Blessings, they do so with Disadvantage. Again, playstyle will determine your pick—do you want to ensure your buffs stay up, or do you want your Bear to keep pace with scaling threats?
Level 8 – Choose between Shared Spirit Claws and Pitiless Nature.
Shared Spirit Claws gives both your Shaman and their Summon the Spirit Claws buff. Meanwhile, Pitiless Nature grants +1 Advantage on attacks against models affected by your Curses. Advantage, as we’ve covered before, is one of the only dice-manipulation tools in the game—it makes a big difference.
This decision is more nuanced. If neither your Shaman nor their Summon are particularly accurate (and due to stat spread, they often aren’t), gaining Advantage might result in a bigger DPS boost. After all, if you miss, those bonus damage dice from Spirit Claws don’t matter. It’s a judgment call, but both options are strong.
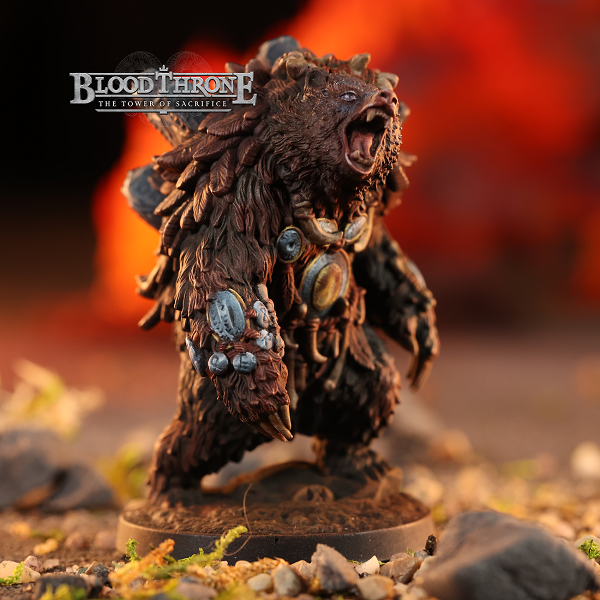
Playing Kar Bjornson
Kar was a ton of fun to write. Beyond just looking absolutely badass, he’s got some real personality. When I first talked to the writing team about his character, I told them to imagine a “hippie Viking.” Kar spends a lot of time in the Dream World—called Gnottgar by his people, the Delgri—and receives visions from nature spirits that guide his actions. Because he’s constantly drifting between the spiritual and physical realms, he often comes across as a bit odd to others. But make no mistake—his insights are valuable, and his combat abilities are undeniable.
The Delgri are our take on a Viking-inspired faction, but with a more savage, naturalistic twist. Less chainmail and longboats, more furs, mysticism, and unrelenting fury. They don’t engage in trade or diplomacy and don’t care about borders. Their Shamans have mastered the art of traveling physically through Gnottgar, allowing them to strike at any culture so long as there’s an exit from the Dream World nearby. Other factions see the Delgri as warlike and untrustworthy—which made Kar’s inclusion in the Hero alliance an interesting storytelling challenge. We had fun coming up with a plausible (and kind of mysterious) reason for it to happen.

Mechanically, Kar is built for melee. His Metaphysics stat is only 2—which is low for a caster—but since most of his buffs don’t require rolling against a target’s defense, it’s fine. His debuffs both target Fortitude, which is often a weaker stat for enemies, and he can always use Focus to boost his odds when it matters.
Where Kar really shines is up close and personal. He has Accuracy 3, which is quite high for a caster, and a Power of 2. That means if he casts Spirit Claws on himself and lands both of his claw attacks, he rolls a total of 10 damage dice—plus 2 RD. That’s a savage hit and puts him in the same offensive tier as high-damage Heroes like Dalnon or Kijo.
Of course, there’s a trade-off. Kar has a pitiful Evasion of 1, so he gets hit—a lot. Fortunately, he has a respectable 18 HP and wears Light Armor, which helps reduce incoming damage. He also has a solid Fortitude of 5 and Will of 4, which provides decent resistance against control effects or special attacks.

Another limitation Kar faces, like all the shorties in the game—Gnomes, Goblins, Dwarves, etc.—is movement. His base Movement is 4, which is going to lose most footraces. To balance this, the short races have very strong Heritage Abilities, and Kar’s Mountain Dwarf heritage is no exception. He gets the Tenacious ability: the first time he would be Knocked Out, he instead stays at 1 HP and becomes Stunned.
This is an amazing ability, and it means you basically have to “kill” Kar twice to take him off the board. It’s a huge survivability boost and goes a long way toward compensating for the fact that he has almost no means of reducing incoming damage outside of gear and healing.
Speaking of gear—once you’ve built the Blacksmith in your Siege Camp, you can upgrade his Light Armor with the Forge upgrade, granting it +1 Damage Reduction. This upgrade is available to any Hero wearing Cloth or Light Armor and makes a noticeable difference when it comes to keeping Kar on his feet in tougher fights.

Tactics
When playing Kar, you’ll typically use your first turn to summon the War Bear. From there, you’ll often cast Spirit Claws—usually on yourself—and Beast’s Hide on whichever ally needs it most. Most of the time, you’ll be Move-Casting both of those to get up the table efficiently.
After that, it’s time to dive in. Kar wants to be in the thick of the fight, where his brutal melee damage can make minced meat out of monsters. Use his debuffs strategically on high-value threats, and keep him advancing up the table, leaving a trail of corpses behind.
Just be careful—monsters will often target the Hero with the lowest relevant defense, and with an Evasion of 1, that’s going to be Kar. So make sure you keep a tanky ally or his Bear nearby to intercept threats. Kar is tough, but he’s not invincible, and getting caught in melee with something like a Berserker without backup will leave him face-down in the dirt.

Counterplay: How to Fight Kar
When playing against Kar, you’ll want to do everything you can to hit him from range. A Hero like Grey Wolf, who combines high damage and high accuracy, is Kar’s worst nightmare. You’ll also want to bring someone who can strip Blessings—like the Inquisitor, or the Transmuter from the Hero Expansion—to remove Spirit Claws or Beast’s Hide before they ruin your plans.
More than anything, don’t let Kar charge into models with low Evasion—he’ll shred them. He’s a bit slow, so you can kite him if you play smart. And keep in mind: Tenacious means you need to finish the job properly. If you go in for the knockout and only manage to almost kill him with your last Action, he’s going to stay standing at 1 HP—and probably hit you back hard. Have a plan to deal with that.
Thanks for reading, and hopefully this gets you excited to try out the Shaman class in Blood Throne! Whether you’re summoning feral beasts, empowering allies with primal strength, or tearing enemies to shreds with Spirit Claws, the Shaman brings wild, flexible power to any party—and Kar Bjornson shows just how devastating that power can be when unleashed on the front lines.
Let us know how your Shaman builds turn out—and may your Bear always hit both claws.